Category: Arts & Crafts

  • A Visit To An Artist’s Studio

    A Visit To An Artist’s Studio

    photo 10
    The artist, Tom Leedy, in front of his painting “Horses Aqua”

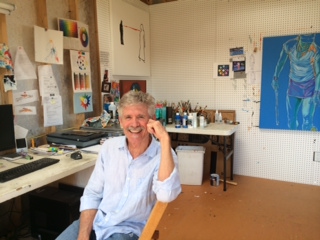
    Earlier this week I got a call from a friend. Fran I’m calling to invite you over to see my artist studio. I was thrilled to receive his invitation!

    Here are a few excerpts from my interview with Tom—

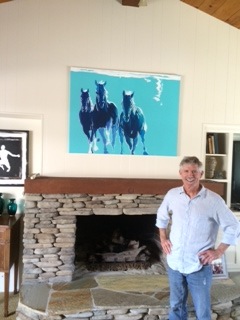
    Tom:  There were two things I knew when I was growing up: one, I was going to marry and have a family, and two, I loved Art! . . . the most amazing achievement and expression of what humans can do! To me there is nothing better than making a good piece of art! I built this space two years ago and I am thrilled with the studio!

    Tom has his bachelors in fine art and was a professional artist for many years. He concentrated on stained glass because it was big in the 70s.

    Having four children is a lot of mouths to feed so Tom went into the computer industry. He thoroughly enjoyed his work in the corporate world traveling to Japan among other countries.

    Tom is a well-rounded individual with many passions; sports, all sports, but running daily and playing tennis two to three times a week, reading, traveling to Hawaii and excursions to see his grandchildren just to name a few.

    Fran: Tom, I see a photo of your dad. Did your father’s love of art influence you to be an artist growing up?

    Tom: I suppose it did subliminally. I remember looking at a portrait my father did of my brother Dave and I thought, I’m going to do that when I grow up.  I was interested in all the things boys are interested in growing up: sports, rockets, cars, but I knew that art was my thing!

    Tom has been painting throughout his life but when he retired he started a routine of painting every afternoon.

    I will never forget the date I retired, May 31 2013, etched in my memory forever as a very Happy Day!

    I couldn’t wait for the time in my life when I could be doing art every day. I realized one day talking with Martha that we could survive without a corporate salary. Then I did it. Kids were raised, out of school and on their feet. I was then free to go back to my first love and passion. I felt liberation, freedom to return to that! I feel like a kid in harmony with the world.  I am grateful.

    Now my days are my own –I take a run either up here in the hills or down on the beach. I think about painting and inevitably images come to mind that I want to capture on canvas. Then I come home, have my lunch and head out to the studio in the garden.

    The creative process —If you could only do one thing to leave a piece of art, that is great, that would be Success! Don’t get me wrong, I think it’s great to be a businessman and build corporations -–awesome achievements in the business world, but great art. . . !

    The struggle–I am maybe too much of a perfectionist to look at one of my pieces and say WOW, that’s it! The danger is that you are so examining of yourself that you overwork it! Not to leave it soon enough, know when to stop.

    Tom has this quote on his wall from author John McPhee:

    People often ask how I know when I’m done – not just when I’ve come to the end, but in all the drafts and revisions and substitutions of one word for another how do I know there is no more to do?  When am I done?  I just know.  I’m lucky that way.  What I know is that I can’t do any better; someone else might do better, but that’s all I can do; so I call it done.

     Tom: I love that one by McPhee.  Especially the part about knowing that he can’t do any better even though someone else might; I find that very liberating, very helpful in accepting one’s own work. I try to remember that!

    Lately Tom has also started sculpting again. He is trying something new, carving in granite.

    Fran: It seems to me Tom, that you are not afraid to start new things, to jump in with both feet and start something new.

    Tom: It’s not scary for me to start a new process because I’ve never done it before. I am not afraid because it’s just for fun and to learn something new. I have confidence that I can draw and make forms and shapes! Can I do it again for a painting, to me, is the struggle because painting for me is the foremost form of art. I am a painter before a sculptor, a drawer before a painter, less scary to mess with sculpting. Like almost easier to excel when your expectations are lower, not so high.

    photo 3
    “The Wave” in Granite

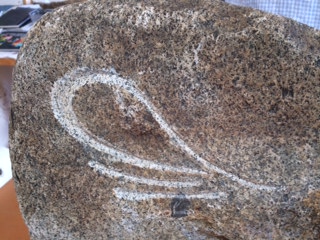
    Tom: I carved a wave in stone – I find this amusing, cracks me up. Stone has seams and stuff like that.  The process of working in stone is almost delicate in a way, even though it is granite! When you start to do something new you know how amazing it is and the amazement for the people who do that kind of art goes up! Blows me away!

    Fran:  Who are your mentors?

    Tom: The guys who could refer to the real world not just the mind. I respond to it. Nobody touches Matisse in color, line and expression.  Vermeer is a sheer marvel and Goya to name a few.

    Tom’s studio is large, organized and light filled. He has photographs of people and relatives whose beauty or differences inspire him to paint. He has several pictures of his beautiful wife and his daughter. Look, wasn’t she a beautiful woman?! Tom exclaimed as we looked at a photo of his deceased mother-in-law.

    Pressfield says it well:

    Steven Pressfield, author – If you find yourself asking yourself (and your friends), Am I really a writer? Am I really an artist? chances are you are. The counterfeit innovator is wildly self-confident. The real one is scared to death.

    Tom: What I like about Pressfield’s statements is that they reflect the almost compulsive love artists must have for their work – something they can’t not do, regardless of how hard or scary it gets for them.

    Tom: I am free again, back in my own skin and I am in the journey, I am starting the run. I think people who can do it well are amazing!

    I came away from the morning with Tom totally inspired to get back into my own studio! As I left I couldn’t help but notice this inspiring quote on his studio door:

    Art is not a thing. . .it is a way~! Elbert Hubbard

    Bye for Now,

    Francesca

    photo 5
    The artist in his studio
  • CREATE YOUR OWN WALL SUCCULENT HANGING PLANTER

    CREATE YOUR OWN WALL SUCCULENT HANGING PLANTER

    Hanging Planter
    My Wall Succulent Hanging Planter

    Here’s a project that is lots of fun. Making your own wall succulent planters will also save you money :)

    A friend’s husband made the boxes for our garden club, but directions for making a simple frame are available here:  Sunset Magazine Article.

    How to make your own succulent frame:

    1. For a 1-foot-square frame, cut four 12-inch lengths of 2×2 lumber. Nail the corners together for a frame 2 inches deep.

    2. Staple or nail a 1-foot square of plywood onto the open back of the frame. Exterior plywood or 1×12-inch redwood works well. You can also channel out a section of the back in order to hang on a wall three months later.

    3. Screw ½-inch hardware wire mesh to one side of the open frame. If desired, add trim on top of the mesh to hide it. (If you’re a skilled woodworker, you can also cut a channel into the wood and slide the mesh into the channel, hiding the mesh’s cut edges.)

    A friend and I were formatting this project for a group of 30 garden club women.

    Soak sphagnum moss overnight in a bucket. Wring out well and generously line the bottom and sides of your frame. Now fill the planter with a 50/50 mix of potting soil and cactus mix.  Make a sphagnum moss sandwich by covering the top with another generous layer of the moss.  Screw the wire mesh down on remaining two sides.

    Co-Garden Club program chair and I had previously bought succulents for all to use. We also suggested people bring succulents from their own gardens to share.

    The best succulents to use for this project are slow growing ones. Visit your local nursery for plant material if you don’t already have succulents from your own garden from which to take cuttings. Here are a few suggestions: Aeoniums, Echeverias, Crassula perforate, Senicio rowleyanus, Sedum spathulifolum. Use your imagination!

    Check out Debra Lee Baldwin, best selling author, Designing with Succulents and Succulent Container Gardens.

    The day of the event was so much fun and everyone’s box turned out differently. Since the beginning of human time women have loved working and creating together. It takes us back to our roots.

    If you intend to hang your succulent planter on a garden wall, wait three months for
    succulents to root.

    In my case, I have enjoyed my succulent boxes as center pieces on outdoor tables that are mainly in shade. I have one that I made a year and a half ago that is a little leggy but still beautiful. With a little housekeeping or should I say gardenkeeping, cutting succulents back, letting them harden off for a week and then replanting; Voila my year and a half leggy planter will look fresh and new.  :)

    Try to use slow growing succulents or ones that do not get too large. I put in what I felt was beautiful. Succulents are so forgiving that it is easy to change things around. Filling boxes tightly with succulents will give you an immediate show stopper look.  :)

    Have fun!

    Bye for now

    Rippin’ Lips

    Francesca

  • THE EASTER EGG HUNT

    THE EASTER EGG HUNT

    I started coloring Easter eggs with my children when they were two years old.  My children are now grown and have little ones of their own. When they were growing up we colored eggs and the children would hunt for them in the garden.One of my earliest memories:I was three years old. My parents took me to an Easter Egg Roll. I spotted one huge rabbit Must have been on steroids! Then,

    Oh My Gosh, a multitude of gigantic rabbits appeared around the bends of a beautiful garden.

    Then, there I was, on the edge of a ginormous lawn surrounded by dozens of children. My eyes grew the size of giant saucers pervading the brightly colored eggs as far as a small child’s eyes could see!

    On Your Marks, Get Set, Go! Throngs of children bolted across the lawn gathering brightly colored eggs in their path.  Memory told me that it was the large high school football field across from our house in Clairemont, California. I later learned from my mother that it was actually Scripps College where my mother had gone to school and the enormous bunnies were actually college students! To this day, as I write the words, I can feel the thrill of several huge rabbits and subsequently trying to avoid being trampled by older children running to gather colorful eggs.

    When my children were off to the University I felt nostalgic for the Easter egg experience.

    Then a light went on in my head!

     Fran, you can color eggs and decorate your dining table and kitchen with them as you always did!

    This year we will have a large family gathering at my mother’s house. There will be lots of little ones running around hunting for eggs. I am coloring four dozen eggs. I now love coloring brown eggs. The colors turn out rich and sophisticated. Check out the blog post my sister wrote about delicious recipes to cook with hard-boiled eggs after Easter on my niece’s blog, Girl’s Gone Child  on her Eat Well page!

    The Easter Brunch tradition started in my husband’s family the year Pete and I were married in 1974.  I loved the new tradition so much. Pete came from a large family of four brothers and sisters. There was always a lot going on in their household. We all sat at a long dining room table. My father-in-law loved to cook, which was something that impressed me at 16 years old when Pete and I started dating. But that is another whole story in itself. Perhaps future blog material :) Let’s just say that we would have a huge spread with my future father-in-law’s famous baby back beef ribs! Soon there were little ones running around and Pete’s sister, the greatest Aunt ever would be in charge of the Easter Egg Hunt. By the way, Julie made specially decorated eggs for all the adults starting that year in 1974.  In later years she spent hours personalizing each egg for each person at the brunch.

    Julie, my sister-in-law was so into the Easter egg hunts that even when all 15 nieces and nephews were in college she made them all go to the back room of my in laws house while we, their parents, hid all the eggs trying to make the hiding places very difficult, may I add!!!

    One year, Pete and I had Easter at our home. Our adult kids, some of them married by now got a great idea. Everyone arrived and was enjoying late morning cocktails when my oldest daughter announced:

    This year is going to be different, Aunt Julie. We, the adult children, are going to hide the eggs for all of you.

    Gaels of laughter especially from Aunt Julie! We were instructed to go to the back room while they hid the eggs!

    We each have our own special traditions and memories.

    Here’s to a Happy Passover, Easter and Egg-licious (is that a word?) Season!

    Bye for now,

    Rippin’ Lips

    Francesca

  • CREATING A BREATHTAKING CENTERPIECE IS EASY & FUN!

    CREATING A BREATHTAKING CENTERPIECE IS EASY & FUN!

    St. Patrick’s Day, last Saturday night, was a leprechaun reason to entertain the neighbors. I love decorating the table for a party. Sometimes, if I am really well organized I do this a day or two before the event.

    Creating an enchanting centerpiece
    is part of the ambiance for a
    successful dinner party.

    Many people don’t know where to begin. Remember finger painting in kindergarten? Painting the Centerpiece is right up there with the kindergarten experience, in my book! I get so excited, I am thrilled as I write to you about creating your own centerpieces. You too can have fun creating your own centerpieces, it’s easy!

    Growing up, my mother did not encourage me to cook with her.

    But creating an elegant centerpiece was different!

    I can remember how fun it was to go out into my mother’s garden and pick plants to bring in the house and put on the table in an interesting design surrounded by votive candles. If Pat, (Patwelsh.com -my mom) had a specific idea in mind she would pick the flowers and greenery herself, but then let me have full creative license in culminating the project. So last night, with the candle’s lit I snapped some quick photos with my smart phone, smile on my face. I was pleased and happy.

     The table has helped set mood for stimulating conversation.

                                                        I always have my dining table set with a centerpiece so all that is needed is to add the                                                                                                  finishing touches.

    In this case I have a gold tablecloth on the table with two runners of gauzy material, one gold and one purple. I intertwine them, then put 3 large candles of different heights on the table. Then I take 5 elk racks that have a candleholder built into each one and place them over the runner.

    Years ago my friend and I bought artistic woodland decorations from Michaels (Michaels.com). That then is the backdrop for whatever theme I chose to create.

    Many times I pick flowers and greenery from my garden to decorate the table. On this particular occasion, I went to Trader Joes (TraderJoes.com) looking for shamrocks, but they had none. No worries. They had darling small roses, bulbs in colorful pots and pink jasmine.

    Great for a St. Paddy’s Spring Display!

     The plants were so reasonable just a few dollars and, by the way, Trader Joes has daffodils this week, just 1.50 a bunch – can’t beat it!

    HAVE FUN CREATING YOUR OWN CENTERPIECES!

    Bye for now

     Rippin Lips

    Francesca